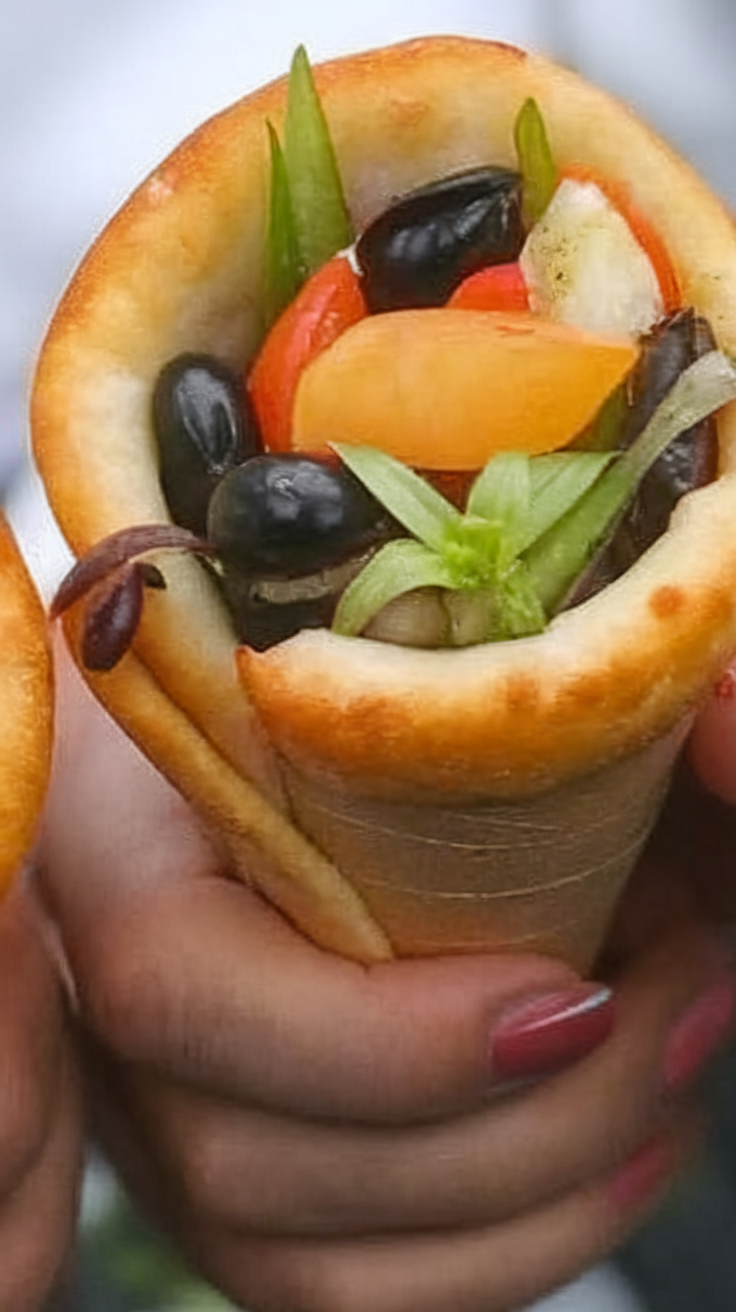
Who knew pizza could be this much fun? Picture this:
your favorite pizza toppings, but in a whimsical cone shape that’s perfect for a party or a cozy night in. It’s like an edible adventure—crispy, cheesy, and endlessly customizable.
Imagine munching on these while watching the latest hit series on Netflix, or serving them at a gathering where everyone gets to play chef.
Steps
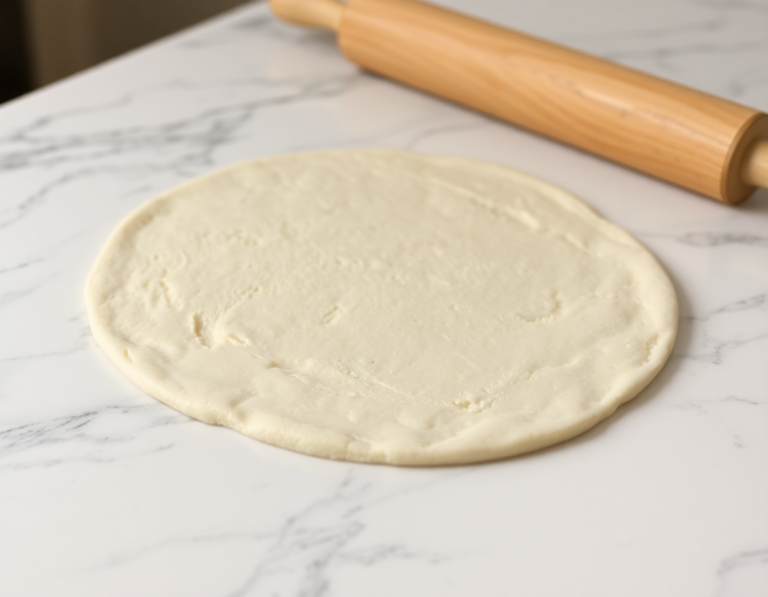
- Roll out the pizza dough to about 1/8 inch thick to ensure it fits the cutter twice. This thin crust doesn’t require much rolling.
- Cut the dough into the required shape and remove any extra dough. Use the leftover dough to make breadsticks.
- Wet the edges of the dough with water, fold it over in half, and press down to seal. Use a crimper along the edges to ensure it is sealed well.
- Allow the cones to rest on the cutting board for 15 minutes. Meanwhile, preheat your oven to 400°F.
- After the dough has rested, gently slide it onto the pizza cone form. Bake for 6-7 minutes until the cone starts browning.
- Place the cone in the pizza cone stand and fill it with your chosen pizza toppings. Return the filled cones to the oven and bake until the tops are golden and bubbly. Let them cool slightly before serving.
Ingredients
- 1 can (11 ounces) of refrigerated Pillsbury™ Thin Crust Pizza Dough
- 1 can (15 ounces) of Muir Glen™ Organic Pizza Sauce
- 1 cup of shredded pizza cheese blend (mozzarella and cheddar)
- 1 cup of your choice of vegetables (such as mushrooms, olives, green peppers, etc.)
- 1 cup of a mix of meats (like bacon, mini pepperoni, and Canadian bacon)
FAQ
- What is a pizza cone?
- A pizza cone is a creative twist on traditional pizza that allows you to enjoy your favorite pizza toppings in a fun, portable cone shape, similar to an ice cream cone.
- What do I need to make pizza cones?
- You will need a can of refrigerated Pillsbury™ Thin Crust Pizza Crust, pizza sauce, shredded pizza cheese, vegetables, and assorted meats. Additionally, a Pizza Cone Set is necessary to shape the dough into cones.
- How do I shape the pizza dough into a cone?
- Roll out the pizza dough to about 1/8 inch thick, cut it using a dough cutter, moisten the edges with water, fold it in half, and seal the edges by pressing down with your fingers and using a crimper.
- How long do I bake the pizza cones?
- After shaping the dough onto the pizza cone form, bake them in a preheated oven at 400°F for 6-7 minutes or until they start to brown.
- Can I customize the toppings in a pizza cone?
- Yes, one of the best things about pizza cones is the ability to personalize them with your choice of toppings, just like a traditional pizza.
Tips
- Consider investing in multiple pizza cone sets if you plan to make more than two cones at a time. This allows you to prepare several cones simultaneously, perfect for larger gatherings or parties.
- After cutting the dough to the desired shape, use any leftover dough to make breadsticks. This ensures that no dough goes to waste and you get a delicious side snack.
- Allow the dough cones to rest on the cutting board for 15 minutes before baking. This helps the dough to settle and can result in a better texture after baking.
- When filling the cones, make sure to place them in a pizza cone stand to keep them upright and to prevent the ingredients from spilling out during the baking process.
Equipment
- Pizza Cone Set – This set is essential for shaping and baking the pizza cones.